Welcome to the very first article of this series on “Reverse Engineering android applications”. To read an overview of the series, refer to the serious announcement blog post.
“Learning is no harm, even if done by Reverse Engineering”
As quoted above, learning is no harm, if reverse engineering is done for the learning and analysis purpose. If you want to see how reverse engineering done using basic tools which are famous among android developers, refer to the Part 9: Reverse engineering android application blog post shared by Paresh in lazy android developers series.
In this part, we shall cover how reverse engineering can be done by using Androguard, how to download and setup Androguard and how to decompile an apk using Androguard. We would look into the deep analysis in future parts of this series.
In this Part
Reverse Engineering using Androguard
- What is Androguard
- How to download and install Androguard
- How to decompile an apk using Androguard
I would request you to watch this demo video on what we are going to learn in this article.
What is Androguard?
Androguard is a python based tool, which can run on Linux/Windows/OSX, provided python is installed in the system. Check: http://code.google.com/p/androguard/
It is powerful tool to disassemble and to decompile android apps. It can be used for the Static Analysis of an application. If you are wondering what is static Analysis, refer this Stackoverflow answer Static code analysis . We often use code obfuscators. Using any reverse engineering tool we can measure the obfuscation level and can converts Android xml files to readable format. We will see all these details later in this article.
How to Download and Install Androguard?
Remark: Linux system is used while performing the tutorial. Wherever needed, steps for windows system would be mentioned.
Download it as a Virtual Machine (Advisable for Windows Users)
Remark:“It is advisable for windows users to download this Virtual Machine, because managing all prerequisites for the Androguard, is headache in Windows”.
Directly download the full pack Virtual machine with all modules required to run the tool.
- A.R.E (Android Reverse Engineering) Virtual Machine is the easiest way to get all the set of tools for Android malware analysis and Reverse Engineering including Androguard. Refer this document on downloading A.R.E virtual machine: https://redmine.honeynet.org/projects/are/wiki
- You can use Androguard directly from Santoku distribution. Santoku is a Linux Distribution, with complete suit of tools of Mobile Forensics, Mobile Security, Reverse Engineering and Mobile malware analysis. Download and run Santoku as a Virtual machine. Refer this document on downloading Santoku https://santoku-linux.com/download
Note:If you have downloaded any of above virtual machine, then directly skip the download steps for Ubuntu system and go to installation directly.
Downloading in Ubuntu/Debian system
Before we proceed further for the installation, let’s check out the prerequisites in the system.
- Make sure Python is installed in your system, if not then install python following this document. https://wiki.python.org/moin/BeginnersGuide/Download
- After installing python, install IPython and pygments, using following command in terminal:
sudo easy_install ipython
sudo easy_install pygments
Now download & install Androguard. We can use either of the ways:
- Using Mercurial version
- Make sure Mercurial is installed in your system. Follow this docs for installation of mercurial. http://mercurial.selenic.com/wiki/Download
- Run this command into Terminal or Command line in windows.
hg clone https://androguard.googlecode.com/hg/ androguard
- Using Git
Installing the Tool:
If you have downloaded the A.R.E (Android Reverse Engineering) virtual machine, start the virtual machine with username and password provided at A.R.E website and navigate to Androguard folder.
If you have downloaded Androguard in live system using hg or git, navigate to the Androguard folder or just copy it to any handy location and navigate to it.
Simply fire the setup.py in with install command.
sudo python setup.py install (For Linux)
Note: Make Sure you have followed all steps required for installation, as actual work begins from here!
Let’s Run Androguard – Decompiling the app
Androguard supports 3 decompilers.
- DAD
- dex2jar + jad
- DED
To know about each of them in detail follow this document on Decompilers. In this part, we will cover how to use the DAD Decompiler in Androguard.
Step 1: Run this command in terminal
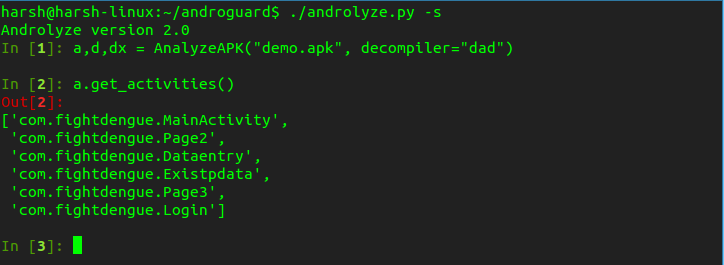
./androlyze.py -s
Step 2: This command will start own input prompt, waiting for input.

Now let’s define the path of apk and type of decompiler we want to use to decompile the app.
Input this command into the prompt and replace path_to_apk with path of the apk we want to analyse.
a,d,dx = AnalyzeAPK("path_to_apk", decompiler="dad")
Remark:In this example we have used anonymous app “demo.apk”.
Depending on the apk, it might take some time to execute and after successful execution of command, it will prompt for APK or DVM specific commands.
Let’s examine list of all Activities in the app. Enter this command in input prompt, it will display all activities in app as output.
a.get_activities()
To get list of all permissions as output, input this command:
a.get_permissions()
To get list of all class names as output, input this command:
d.get_classes_names()
To get list of all strings defined in app as output, input this command:
d.get_strings()
To get list of all methods in a class as output, input this command:
d.get_methods()
Refer to this document for all such APK (a.get) and DVM (d.get) specifics commands.
In Summary
This bring us to the end of this part. In this part, we talked about Androguard, how to download and install it and we have also talked about decompiling an apk using Androguard. We shall talk about doing deep analysis using Androguard and other tools in the next part.


